Monday, October 12, 2020

Testing a Spring Boot Kotlin application with Kotest Example


How to use the SpringListener from Kotest to test Spring Boot applications, including some samples


Hello Kotliners!

In this article we'll see how to test Spring Boot apps using the Kotest Framework. We'll see some examples on how we test things using JUnit, and how to easily move to Kotest and enjoy it's features.

3 simple steps

  1. Add Kotest's Spring Extension to your build.gradle
  2. Transform your JUnit test into Kotest format (or create a new test from scratch)
  3. Add the SpringListener to your class

Add Kotest Spring Extension

On your build.gradle file we'll add the Spring Extension dependency as a testImplementation. I'm assuming you already have Kotest configured. If you don't, take a look at the docs on how to do it.


I like to keep the Spring Extension definition close to my Kotest definition

build.gradle

dependencies {
    // ... Your dependencies ... 

    // Kotest
    testImplementation("io.kotest:kotest-runner-junit5:{version}")
    testImplementation("io.kotest:kotest-extensions-spring:{version}")

}


Transform a JUnit test to a Kotest Spec

For this part we'll assume that we already have a component in our application:

@Component
class SimpleComponent {
    fun foo() = "Bar"
}

Yes yes, it's very simple and very dummy... But stay with me, we will go step by step!

We usually write a JUnit + Spring integrated test for this, validating that this bean works correctly.

There.are.many.guides that show us how to do it. Let's take this basic approach:

@RunWith(SpringRunner::class)
@SpringBootTest
class SimpleComponentTest  {

    @Autowired
    private lateinit var simpleComponent: SimpleComponent

    @Test
    fun fooShouldReturnBar(){
        Assert.assertEquals("Bar", simpleComponent.foo())
    }
}

Transform that test in a Kotest Spec

There are a lot of styles that can be used in Kotest, let's try with FunSpec.

Let's convert it exactly as is:

@RunWith(SpringRunner::class)
@SpringBootTest
class SimpleComponentTest : FunSpec() {

    @Autowired
    private lateinit var simpleComponent: SimpleComponent

    init {
        test("foo should return Bar") {
            simpleComponent.foo() shouldBe "Bar"
        }
    }
}

Aaaand our test crashes.

kotlin.UninitializedPropertyAccessException: lateinit property simpleComponent has not been initialized

It's ok, it's ok! We need to tell Kotest that this is a Spring Test!

Add the SpringListener to the class

To fix the above error, we need to add the SpringListener to our class' listeners:

@SpringBootTest
class SimpleComponentTest : FunSpec() {

    override fun listeners(): List<TestListener> {
        return listOf(SpringListener)
    }

    @Autowired
    private lateinit var simpleComponent: SimpleComponent

    init {
        test("foo should return Bar") {
            simpleComponent.foo() shouldBe "Bar"
        }
    }
}

Notice that we also removed the @RunWith(SpringRunner::class), as we are not running with JUnit anymore.

And voilà, it works!

Of course this is a very modest example. What about all the other configurations? Profiles, context configuration, TestConfiguration?

Don't worry! they'll work the same way as we're used to in JUnit. Annotating the constructor and such.

For example, messing with profiles:

@SpringBootTest(classes = [Components::class])
@ActiveProfiles("test-profile")
class ActiveProfileSpringTest : FunSpec() {

    override fun listeners() = listOf(SpringListener)

    @Value("\${test-foo}")
    lateinit var testFoo: String

    init {
        test("Should load active profile properties correctly") {
            testFoo shouldBe "bar"
        }
    }

}

test from Kotest test suite

And this is all we have for today! Go ahead and test your Spring Apps with Kotest! More information on this extension can be found at the docs

Doubts? Suggestions? Leave us a comment!


Reference :


Spring Data Native Queries and Projections with Spring Boot Kotlin Example


 This blog describes the solution to mapping native queries to objects. This is useful because sometimes you want to use a feature of the underlying database implementation (such as PostgreSQL) that is not part of the JPQL standard. By the end of this blog you should be able to confidently use native queries and use their outcome in a type-safe way.

In creating great applications based on Machine Learning solutions, we often come across uses for frameworks and databases that aren’t exactly standard. We sometimes need to build functionality that is either so new or so specific that it hasn’t been adopted into JPA implementations yet.

Working on a project with Spring Data is usually simple albeit somewhat opaque. Write a repository, annotate methods with @Query annotation and presto! You have mapped your database entities to Kotlin objects. Especially since Spring Framework 5 many of the interoperability issues (such as nullable values that are never null) have been alleviated.

Confucius wrote “Real knowledge is to know the extent of one’s ignorance”. So, to gauge the extent of our ignorance, let’s have a look at what happens when we cannot use the JPA abstraction layer in full and instead need to work with native queries.

Setting up the entity

When you use non-JPA features of the underlying database store, things can become complex.
Let’s say we have the following PostgreSQL table for storing people:

CREATE TABLE person (
  id BIGSERIAL NOT NULL UNIQUE PRIMARY KEY,
  first_name VARCHAR(20),
  last_name VARCHAR(20)
);

Given we represent an individual person like this:

import javax.persistence.Entity
import javax.persistence.GeneratedValue
import javax.persistence.Id
import javax.persistence.Table

@Entity
@Table(name = "person")
class PersonEntity {
  @Id
  @GeneratedValue
  var id: Long? = null
  var firstName: String? = null
  var lastName: String? = null
}

We can access that using a Repository:

import org.springframework.data.jpa.repository.JpaRepository
import org.springframework.stereotype.Repository
@Repository interface PersonRepo : JpaRepository<PersonEntity, Long>

We could now implement a custom query on the repository as follows:

import org.springframework.data.jpa.repository.JpaRepository
import org.springframework.stereotype.Repository

@Repository interface PersonRepo : JpaRepository<PersonEntity, Long> {

  @Query("FROM PersonEntity WHERE first_name = :firstName")
  fun findAllByFirstName(@Param("firstName") firstName: String):
    List<PersonEntity>
}

So far so good. It uses JPQL syntax to form database-agnostic queries which is nice because we get some validation of these queries when starting the application, plus the added benefit of the syntax being database-type ignorant.

Adding a native query

Sometimes however, we want to use syntax that is specific to the database that we are using. We can do that by adding the boolean nativeQuery attribute to the @Query annotation and using Postgres’ SQL instead of JPQL:

@Query("SELECT first_name, random() AS luckyNumber FROM person",
    nativeQuery = true)
fun getPersonsLuckyNumber(): LuckyNumberProjection?

Obviously this example is simple for the sake of this context, more practical applications are in the area of using the extra data types that Postgres offers such as the cube data type for storing matrices.

You may be, as I was at first, tempted to write a class for LuckyNumberProjection.

class LuckyNumberProjection {
  var firstName: String? = null
  var luckyNumber: Float? = null
}

You will run cause into the following error:

org.springframework.core.convert.ConverterNotFoundException: No converter found
capable of converting from type
[org.springframework.data.jpa.repository.query.AbstractJpaQuery$TupleConverter$TupleBackedMap]
to type
[com.trifork.machinelearning.PersonRepo$LuckyNumberProjection]

The accompanying stack trace points in the direction of converters. This then makes you need to add a converter. However that doesn’t seem like it should be as hard. Good for us it turns out it isn’t!

Turns out that contrary to Entities, Projections, like Repositories, are expected to be interfaces. So let’s do that instead:

interface LuckyNumberProjection {
  val firstName: String?
  val luckyNumber: Float
}


This should set you straight next time you want to get custom objects mapped out of your JPA queries.

At Trifork Amsterdam, we are currently doing multiple projects using Kotlin using frameworks such as Spring Boot, Axon Framework and Project Reactor on top of Kubernetes clusters using Helm to build small and smart microservices. More and more of those microservices contain our Machine Learning based solutions. These are in a variety of areas ranging from natural language processing (NLP) to time-series analysis and clustering data for recommender systems and predictive monitoring.


Reference :


Spring Boot Kotlin - Scheduling Tasks Example

Kotlin is fully interoperable with Spring Boot which makes Spring and Kotlin a perfect companion to one another. Spring brings a high level platform that can be used for making just about any enterprise grade application, while Kotlin offers language features that make your code concise and readable. Both Kotlin and Spring do a great job of reducing boilerplate in your code so that you can write an application quickly and get to the point.

This tutorial is based on Scheduling Tasks found on the Spring website is an adapation of the tutorial for Kotlin. We will be using Kotlin, Spring Boot, and Gradle. You can find the code here.

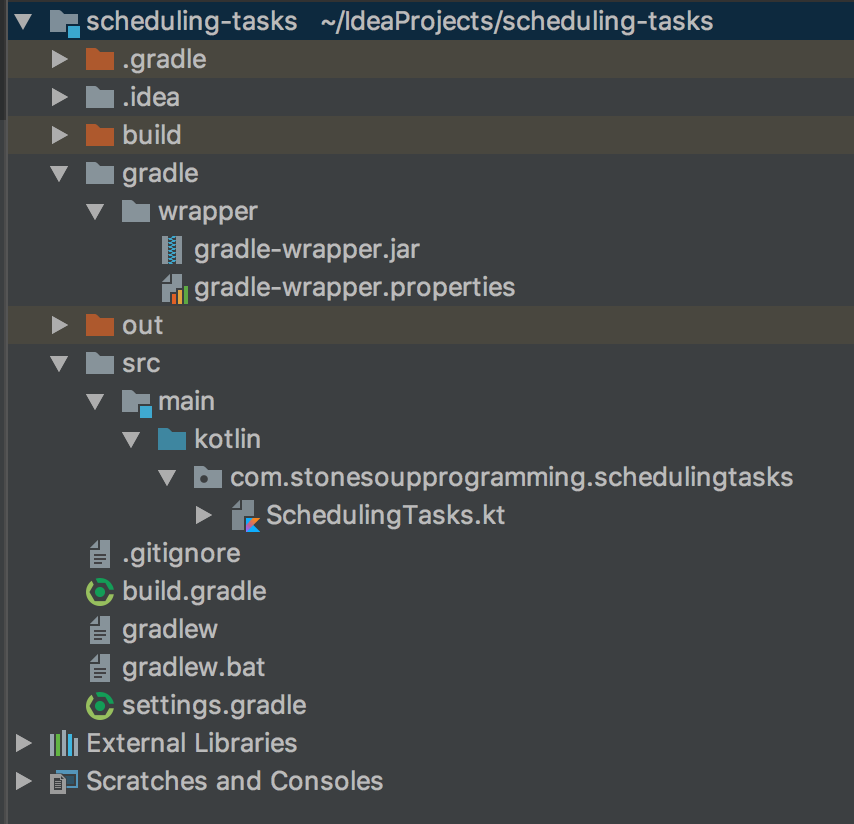
Project Structure

You should setup your project to use this folder structure.


build.gradle

Here is the full code for your gradle.build file. Notice that will bring in both Kotlin and Spring libraries so that we can build the project.

1
2
3
4
5
6
7
8
9
10
11
12
13
14
15
16
17
18
19
20
21
22
23
24
25
26
27
28
29
30
31
32
33
34
35
36
37
38
39
40
41
42
43
44
45
46
47
buildscript {
    ext.kotlin_version = '1.2.30'
 
    repositories {
        mavenCentral()
    }
    dependencies {
        classpath "org.jetbrains.kotlin:kotlin-gradle-plugin:$kotlin_version"
        classpath "org.springframework.boot:spring-boot-gradle-plugin:2.0.1.RELEASE"
    }
}
 
group 'com.stonesoupprogramming'
version '1.0-SNAPSHOT'
 
apply plugin: 'kotlin'
apply plugin: 'java'
apply plugin: 'eclipse'
apply plugin: 'idea'
apply plugin: 'org.springframework.boot'
apply plugin: 'io.spring.dependency-management'
 
repositories {
    mavenCentral()
}
 
bootJar {
    baseName = 'gs-scheduling-tasks'
    version =  '0.1.0'
}
 
sourceCompatibility = 1.8
targetCompatibility = 1.8
 
dependencies {
    compile "org.springframework.boot:spring-boot-starter"
    compile "org.jetbrains.kotlin:kotlin-stdlib-jdk8:$kotlin_version"
    compile group: 'org.jetbrains.kotlin', name: 'kotlin-reflect', version: '1.2.30'
    testCompile "junit:junit"
}
 
compileKotlin {
    kotlinOptions.jvmTarget = "1.8"
}
compileTestKotlin {
    kotlinOptions.jvmTarget = "1.8"
}

SchedulingTasks.kt

Here is the Kotlin code followed by an explanation.

1
2
3
4
5
6
7
8
9
10
11
12
13
14
15
16
17
18
19
20
21
22
23
24
25
26
27
28
29
30
31
32
33
34
35
36
37
38
39
package com.stonesoupprogramming.schedulingtasks
 
import org.slf4j.LoggerFactory
import org.springframework.boot.SpringApplication
import org.springframework.boot.autoconfigure.SpringBootApplication
import org.springframework.scheduling.annotation.EnableScheduling
import org.springframework.scheduling.annotation.Scheduled
import org.springframework.stereotype.Component
import java.time.LocalDateTime
import java.time.format.DateTimeFormatter
 
/**
 * Mark this class an injectable component so that the Spring environment will create
 * an instance of this class when it starts up.
 */
@Component
class ScheduleTasks {
 
    private val logger = LoggerFactory.getLogger(ScheduleTasks::class.java)
 
    /**
     * This @Schedule annotation run every 5 seconds in this case. It can also
     * take a cron like syntax.
     */
    @Scheduled(fixedRate = 5000)
    fun reportTime(){
        logger.info("The time is now ${DateTimeFormatter.ISO_LOCAL_TIME.format(LocalDateTime.now())}")
    }
}
 
@SpringBootApplication
//Required to tell Spring to run tasks marked with @Scheduled
@EnableScheduling
open class Application
 
fun main(args : Array){
    SpringApplication.run(Application::class.java)
}

When run, you will get this output on your console every five seconds.

1
2
2018-04-06 18:51:21.868  INFO 20294 --- [pool-1-thread-1] c.s.schedulingtasks.ScheduleTasks        : The time is now 18:51:21.865
2018-04-06 18:51:26.858  INFO 20294 --- [pool-1-thread-1] c.s.schedulingtasks.ScheduleTasks        : The time is now 18:51:26.858

Explanation

So how does the code work? The ScheduleTasks class is annotaded with @Component, which the Spring environment scans for on start up and instantiates the class. At this point, an instance of ScheduleTasks lives in the ApplicationContent. You will notice that the ScheduleTasks::reportTime function is annotated with @Scheduled which defaults to a fix rate or can use a CRON like syntax.

You can’t annotate a method and expect it to run without turning on scheduling. That is why the Application class is annotated with @EnableScheduling. This will tell Spring to scan all container managed classes and look for the @Scheduled annotation. The Spring environment will do the job of making sure that the methods run at the proper time.

Code

You can get the code for this tutorial at my GitHub: https://github.com/archer920/scheduling-tasks