Friday, October 1, 2021

How to Configure PostgreSQL to Accept All Incoming Connections


Edit pg_hba.conf

Just use 0.0.0.0/0

host    all             all             0.0.0.0/0            md5

Make sure the listen_addresses in postgresql.conf (or ALTER SYSTEM SET) allows incoming connections on all available IP interfaces.

listen_addresses = '*'

After the changes you have to reload the configuration. One way to do this is execute this SELECT as a superuser.

SELECT pg_reload_conf();

** Note: to change listen_addresses, a reload is not enough, and you have to restart the server.


Reference :


Wednesday, May 26, 2021

How to Install ESP32 Board in Arduino IDE (Windows, Mac OS & Linux)


There’s an add-on for the Arduino IDE that allows you to program the ESP32 using the Arduino IDE and its programming language. In this tutorial we’ll show you how to install the ESP32 board in Arduino IDE whether you’re using Windows, Mac OS or Linux.

Installation

Step 1

Install Arduino IDE from https://arduino.cc/en/software

Step 3

Install ESP32 Add-on in Arduino IDE

  1. In your Arduino IDE, go to File > Preferences


  2. Enter https://dl.espressif.com/dl/package_esp32_index.json into the “Additional Board Manager URLs” field as shown in the figure below. Then, click the “OK” button:


    Note: if you already have the ESP8266 boards URL, you can separate the URLs with a comma as follows:

    https://dl.espressif.com/dl/package_esp32_index.json, http://arduino.esp8266.com/stable/package_esp8266com_index.json

  3. Open the Boards Manager. Go to Tools > Board > Boards Manager…


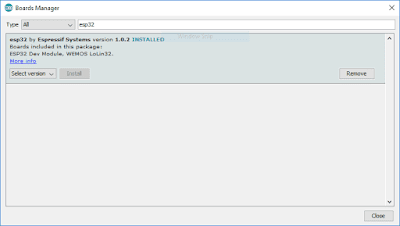
  4. Search for ESP32 and press install button for the “ESP32 by Espressif Systems“:


  5. That’s it. It should be installed after a few seconds.


  6. Finish

Testing the Installation

Plug the ESP32 board to your computer. With your Arduino IDE open, follow these steps:
  1. Select your Board in Tools > Board menu (in my case it’s the DOIT ESP32 DEVKIT V1)


  2. Select the Port


  3. Open the following example under File > Examples > WiFi (ESP32) > WiFiScan


  4. A new sketch opens in your Arduino IDE:


  5. Press the Upload button in the Arduino IDE. Wait a few seconds while the code compiles and uploads to your board.


  6. If everything went as expected, you should see a “Done uploading.” message.


  7. Open the Arduino IDE Serial Monitor at a baud rate of 115200

  8. Press the ESP32 on-board Enable button and you should see the networks available near your ESP32:


Troubleshooting

If you try to upload a new sketch to your ESP32 and you get this error message “A fatal error occurred: Failed to connect to ESP32: Timed out… Connecting…“. It means that your ESP32 is not in flashing/uploading mode.

Having the right board name and COM port selected, follow these steps:
  • Hold-down the “BOOT” button in your ESP32 board


  • Press the “Upload” button in the Arduino IDE to upload your sketch:


  • After you see the  “Connecting….” message in your Arduino IDE, release the finger from the “BOOT” button:


  • After that, you should see the “Done uploading” message
That’s it. Your ESP32 should have the new sketch running. Press the “ENABLE” button to restart the ESP32 and run the new uploaded sketch.

You’ll also have to repeat that button sequence every time you want to upload a new sketch.
If you experience any problems or issues with your ESP32, take a look at our in-depth ESP32 Troubleshooting Guide.

Wrapping Up

This is a quick guide that illustrates how to prepare your Arduino IDE for the ESP32 on a Windows PC, Mac OS X, or Linux computer. If you encounter any issues during the installation procedure, take a look at the ESP32 troubleshooting guide.


Wednesday, March 24, 2021

JavaScript: Firebase Configuration & Important REST API's Example


Configuration & Simple Example

How to configuration your apps, send message, validate registration id, manage topic, manage group, batch, etc with Firebase Cloud Messaging ?

  1. Step 1
    Register & Get Configuration from https://console.firebase.google.com/
  2. Step 2
    For simple examples: Create file index.html & firebase-messaging-sw.js
  3. Step 3
    Let's follow the code below

index.html

<!--
	Notification using Firebase Example
	-----------------------------------

	Step 1 : Create file index.html & firebase-messaging-sw.js
	Step 2 : Register & Get Configuration from https://console.firebase.google.com/
	Step 2 : You need to run this app at http://{host}
	Step 3 : Done

	-----------------------------------

	Reference :
		- https://firebase.google.com/docs/cloud-messaging/js/client?hl=id
		- https://www.youtube.com/watch?v=BsCBCudx58g
		- https://firebase.google.com/docs/cloud-messaging/http-server-ref?hl=id
		- https://medium.com/@selvaganesh93/firebase-cloud-messaging-important-rest-apis-be79260022b5
		- https://medium.com/@sachinkhard/send-push-notification-via-firebase-by-postman-3f459ea5d170
		- https://firebase.google.com/docs/cloud-messaging/android/device-group
		- https://stackoverflow.com/a/60247902/9278668
		- https://stackoverflow.com/a/51529975/9278668
-->
<html>
<head>
	<title>Notification using Firebase Example</title>
</head>
<body>
	<h1>Notification using Firebase Example</h1>

	<button onclick="uninstallServiceWorker()">Uninstall Service Worker</button>
	<button onclick="inspectServiceWorker()">Inspect Service Worker</button>

	<br /><br />

	Open : <a href="chrome://inspect/#service-workers">chrome://inspect/#service-workers</a> for <b>inspect</b> <i>service worker</i> in google chrome

</body>
</html>

<script src="https://www.gstatic.com/firebasejs/8.3.0/firebase-app.js"></script>
<script src="https://www.gstatic.com/firebasejs/8.3.0/firebase-messaging.js"></script>

<script type="text/javascript">
let firebaseConfig = {
	apiKey: "{YOUR_FIREBASE_API_KEY}",
	authDomain: "{YOUR_FIREBASE_AUTH_DOMAIN}",
projectId: "{YOUR_FIREBASE_PROJECT_ID}",
storageBucket: "{YOUR_FIREBASE_STORAGE_BUCKET}",
messagingSenderId: "{YOUR_FIREBASE_SENDER_ID}",
appId: "{YOUR_FIREBASE_APP_ID}",
measurementId: "{YOUR_FIREBASE_MEASUREMENT_ID}"
}; // Initialize Firebase firebase.initializeApp(firebaseConfig); const messaging = firebase.messaging(); messaging.requestPermission() .then(function() { console.log('[BROWSER-FIREBASE] - Have permission'); return messaging.getToken(); }) .then(function(currentToken) { console.log('[BROWSER-FIREBASE] - Firebase Client Token :', currentToken); }) .catch(function(err) { console.log('[BROWSER-FIREBASE] - Error Occurred.', err); }); // Only on Window messaging.onMessage(function(payload) { console.log('[BROWSER-FIREBASE] - Received Foreground Message : ', payload); // https://stackoverflow.com/a/60247902/9278668 navigator.serviceWorker.getRegistration('/firebase-cloud-messaging-push-scope').then(registration => { let options = { body : payload.data.body, actions : JSON.parse(payload.data.actions), data : payload.data }; registration.showNotification( payload.data.title, options ) }); }); </script> <script type="text/javascript"> function uninstallServiceWorker() { if('serviceWorker' in navigator) { navigator.serviceWorker.getRegistrations().then(function(registrations) { for(let registration of registrations) { console.log('[BROWSER] - Uninstalled service worker successful.', registration); registration.unregister(); } }); } } function inspectServiceWorker() { alert('Open -> chrome://inspect/#service-workers'); window.location = 'chrome://inspect/#service-workers'; } </script>

firebase-messaging-sw.js

importScripts('https://www.gstatic.com/firebasejs/8.3.0/firebase-app.js');
importScripts('https://www.gstatic.com/firebasejs/8.3.0/firebase-messaging.js');

let firebaseConfig = {
	apiKey: "{YOUR_FIREBASE_API_KEY}",
authDomain: "{YOUR_FIREBASE_AUTH_DOMAIN}",
projectId: "{YOUR_FIREBASE_PROJECT_ID}",
storageBucket: "{YOUR_FIREBASE_STORAGE_BUCKET}",
messagingSenderId: "{YOUR_FIREBASE_SENDER_ID}",
appId: "{YOUR_FIREBASE_APP_ID}",
measurementId: "{YOUR_FIREBASE_MEASUREMENT_ID}"
}; // Initialize Firebase firebase.initializeApp(firebaseConfig); const messaging = firebase.messaging(); messaging.onBackgroundMessage(function(payload) { console.log('[SERVICE-WORKER-FIREBASE] - Received Background Message : ', payload); // Customize notification here let options = { body : payload.data.body, actions : JSON.parse(payload.data.actions), data : payload.data }; return self.registration.showNotification(payload.data.title, options); }); // https://stackoverflow.com/a/51529975/9278668 self.addEventListener('notificationclick', (event) => { console.log('Event :', event); console.log('Event Action :', event.action); event.waitUntil(async function () { let clientList = await clients.matchAll({ includeUncontrolled: true }); console.log('clientList :', clientList); let currentClient; for (let client of clientList) { console.log('client :', client); if (client['url'].indexOf(event.notification.data.click_action) >= 0) { client.focus(); currentClient = client; break; } } if (!currentClient) { currentClient = await clients.openWindow(event.notification.data.click_action); } }()); });


Important REST API you need to know

  1. Send Notification
    URL : https://fcm.googleapis.com/fcm/send
    Method : POST
    Header :
    - Authorization : key={YOUR_SERVER_KEY}
    Request Body :
    {
    	"data":{
    		"title":"New Text Message",
    		"body":"Hello how are you?",
    		"image":"https://firebase.google.com/images/social.png",
    		"icon":"https://firebase.google.com/images/favicon.png",
    		"badge":"https://firebase.google.com/images/favicon.png",
    		"meta":{
    			"type":"small",
    			"info":"Search"
    		}
    	},
    	"to":"{CLIENT_TOKEN_ID}"
    }
    
    Response :
    {
    	"multicast_id":4921980195954539141,
    	"success":1,
    	"failure":0,
    	"canonical_ids":0,
    	"results":[
    		{
    			"message_id":"0:1616595535458896%e609af1cf9fd7ecd"
    		}
    	]
    }
    

  2. Send Notification to Multiple Registration IDs
    URL : https://fcm.googleapis.com/fcm/send
    Method : POST
    Header :
    - Authorization : key={YOUR_SERVER_KEY}
    Request Body :
    {
    	"data":{
    		"title":"New Text Message",
    		"body":"Hello how are you?",
    		"image":"https://firebase.google.com/images/social.png",
    		"icon":"https://firebase.google.com/images/favicon.png",
    		"badge":"https://firebase.google.com/images/favicon.png",
    		"meta":{
    			"type":"small",
    			"info":"Search"
    		}
    	},
    	"registration_ids":[
    		"{CLIENT_TOKEN_ID_1}",
    		"{CLIENT_TOKEN_ID_2}",
    		"{CLIENT_TOKEN_ID_3}",
    		"..."
    	]
    }
    Response :
    {
    	"multicast_id":4921980195954539141,
    	"success":1,
    	"failure":0,
    	"canonical_ids":0,
    	"results":[
    		{
    			"message_id":"0:1616595535458896%e609af1cf9fd7ecd"
    		}
    	]
    }
    

  3. Validate Registration ID
    URL : https://iid.googleapis.com/iid/info/{CLIENT_TOKEN}?details=true
    Method : GET
    Header :
    - Authorization : key={YOUR_SERVER_KEY}
    Response :
    {
    	"application":"com.chrome.windows",
    	"subtype":"wp:http://127.0.0.1/#CAE6289F-8CD2-4D33-8B18-A3C22E76B-V2",
    	"scope":"*",
    	"authorizedEntity":"1065953619143",
    	"platform":"BROWSER"
    }
    

  4. Create Group
    URL : https://fcm.googleapis.com/fcm/notification
    Method : POST
    Header :
    - Authorization : key={YOUR_SERVER_KEY}
    - project_id : {YOUR_SENDER_ID}
    Request Body :
    {
    	"operation":"create",
    	"notification_key_name":"{YOUR_GROUP_KEY_NAME}",
    	"registration_ids":[
    		"{CLIENT_TOKEN_ID_1}",
    		"{CLIENT_TOKEN_ID_2}",
    		"{CLIENT_TOKEN_ID_3}",
    		"..."
    	]
    }
    Response :
    {
    	"notification_key":"{NOTIFICATION_KEY}"
    }
    

  5. Send Notification to Group
    URL : https://fcm.googleapis.com/fcm/send
    Method : POST
    Header :
    - Authorization : key={YOUR_SERVER_KEY}
    Request Body :
    {
    	"data":{
    		"title":"New Text Message",
    		"body":"Hello how are you?",
    		"image":"https://firebase.google.com/images/social.png",
    		"icon":"https://firebase.google.com/images/favicon.png",
    		"badge":"https://firebase.google.com/images/favicon.png",
    		"meta":{
    			"type":"small",
    			"info":"Search"
    		}
    	},
    	"to":"{NOTIFICATION_KEY}"
    }
    Response :
    {
    	"success":3,
    	"failure":0
    }
    

  6. Create Topic
    URL : https://iid.googleapis.com/iid/v1:batchAdd
    Method : POST
    Header :
    - Authorization : key={YOUR_SERVER_KEY}
    - Content-Type : application/json
    Request Body :
    {
    	"to":"/topics/YOUR_TOPIC_NAME",
    	"registration_tokens":[
    		"{CLIENT_TOKEN_ID_1}",
    		"{CLIENT_TOKEN_ID_2}",
    		"{CLIENT_TOKEN_ID_3}",
    		"..."
    	]
    }

  7. Remove Topic
    URL : https://iid.googleapis.com/iid/v1:batchRemove
    Method : POST
    Header :
    - Authorization : key={YOUR_SERVER_KEY}
    - Content-Type : application/json
    Request Body :
    {
    	"to":"/topics/{TOPIC_NAME}",
    	"registration_tokens":[
    		"{CLIENT_TOKEN_ID_1}",
    		"{CLIENT_TOKEN_ID_2}",
    		"{CLIENT_TOKEN_ID_3}",
    		"..."
    	]
    }
    

  8. Send Notification to Topic
    URL : https://fcm.googleapis.com/fcm/send
    Method : POST
    Header :
    - Authorization : key={YOUR_SERVER_KEY}
    Request Body :
    {
    	"data":{
    		"title":"New Text Message",
    		"body":"Hello how are you?",
    		"image":"https://firebase.google.com/images/social.png",
    		"icon":"https://firebase.google.com/images/favicon.png",
    		"badge":"https://firebase.google.com/images/favicon.png",
    		"meta":{
    			"type":"small",
    			"info":"Search"
    		}
    	},
    	"to":"/topics/{TOPIC_NAME}"
    }
    Response :
    {
    	"message_id":{GENERATED_MESSAGE_ID}
    }
    

Note :

  1. iOS users receive notifications if it contains “notification” key and android users will receive notification for both notification and data key.
  2. iOS users will receive background notification if it contains both key value pair “content_available” : true and “priority” : “high
  3. For iOS notification must contain keys title and body to receive notification

Reference :


Tuesday, March 16, 2021

Web APIs : Wake Lock Example


The Screen Wake Lock API provides a way to prevent devices from dimming or locking the screen when an application needs to keep running.

How to request & release screen wake lock programmatically?

Let's follow the code below:

index.html

<!--
	Wake Lock Example
	-----------------------------------

	The Screen Wake Lock API provides a way to prevent devices from dimming or locking the screen when an application needs to keep running.

	-----------------------------------

	Reference :
		- https://developer.mozilla.org/en-US/docs/Web/API/Screen_Wake_Lock_API
-->
<html>
<head>
	<title>Wake Lock Example</title>
</head>
<body>
	<h1>Wake Lock Example</h1>

	<button onclick="requestWakeLock()">Request WakeLock</button>
	<button onclick="releaseWakeLock()">Release WakeLock</button>

</body>
</html>

<script type="text/javascript">
if ('wakeLock' in navigator) {
	console.log('Screen Wake Lock API supported!');
}
else {
	console.log('Wake lock is not supported by this browser.');
}

// Create a reference for the Wake Lock.
let wakeLock = null;

async function requestWakeLock() {
	// create an async function to request a wake lock
	try {
		wakeLock = await navigator.wakeLock.request('screen');
		console.log('Wake Lock is active!');

		wakeLock.addEventListener('release', () => {
			// the wake lock has been released
			console.log('Wake Lock has been released');
		});
	}
	catch (e) {
		// The Wake Lock request has failed - usually system related, such as battery.
		console.log(`${e.name}, ${e.message}`);
	}
}

function releaseWakeLock() {
	if(wakeLock !== null && wakeLock !== undefined) {
		wakeLock.release().then(() => {
			wakeLock = null;
		});
	}
}
</script>


Reference :


Monday, March 15, 2021

Notification using Service Worker Example


How to create notification using Service Worker?

Let's follow the code below :

index.html

<!--
	Notification using Service Worker Example
	-----------------------------------

	Step 1 : Create file index.html & sw.js
	Step 2 : You need to run this app at http://{host}
	Step 3 : Done

	-----------------------------------

	Reference :
		- https://developers.google.com/web/fundamentals/primers/service-workers
		- https://stackoverflow.com/a/33705250/9278668
		- https://stackoverflow.com/a/31480604/9278668
		- https://serviceworke.rs/push-clients_service-worker_doc.html
		- https://css-tricks.com/creating-scheduled-push-notifications/
		- https://developer.mozilla.org/en-US/docs/Web/API/ServiceWorkerRegistration/showNotification
		- https://developer.mozilla.org/en-US/docs/Web/API/ServiceWorkerGlobalScope/message_event
-->
<html>
<head>
	<title>Notification using Service Worker Example</title>
</head>
<body>
	<h1>Notification using Service Worker Example</h1>

	<button onclick="installServiceWorker()">Install Service Worker</button>
	<button onclick="uninstallServiceWorker()">Uninstall Service Worker</button>
	<button onclick="inspectServiceWorker()">Inspect Service Worker</button>

	<button onclick="showNotification()">Show Notification</button>
	<button onclick="closeAllNotifications()">Close All Notifications</button>

	<br /><br />

	Open : <a href="chrome://inspect/#service-workers">chrome://inspect/#service-workers</a> for <b>inspect</b> <i>service worker</i> in google chrome

</body>
</html>

<script type="text/javascript">
function installServiceWorker() {
	if('serviceWorker' in navigator) {
		// Install Service Worker
		navigator.serviceWorker.register('./sw.js').then(function(registration) {
			console.log('[BROWSER] - Service worker registration successful with scope : ' + registration.scope);
		}, function(err) {
			console.error('[BROWSER] - Service worker registration failed :', err);
		});

		// Init to listen incoming message from service worker
		navigator.serviceWorker.addEventListener('message', function(event) {
			console.log('Event : ', event);
			console.log('postMessage : ', event.data);

			alert("Message from Service Worker :\n\n" + "postMessage : " + event.data + "\n\n" + "Event : " + JSON.stringify(event));
		});
	}
}
function uninstallServiceWorker() {
	if('serviceWorker' in navigator) {
		navigator.serviceWorker.getRegistrations().then(function(registrations) {
			for(let registration of registrations) {
				console.log('[BROWSER] - Uninstalled service worker successful.', registration);
				registration.unregister();
			} 
		});
	}
}
function inspectServiceWorker() {
	alert('Open -> chrome://inspect/#service-workers');
	window.location = 'chrome://inspect/#service-workers';
}
async function showNotification(title, body) {
	const reg = await navigator.serviceWorker.getRegistration();
	Notification.requestPermission().then(function(permission) {
		if (permission !== 'granted') {
			alert('You need to allow push notifications');
		}
		else {
			reg.showNotification(
				'Demo Push Notification', {
					tag: 'my-simple-notification-sw', // a unique ID
					body: 'Hello World', // content of the message notification
					data: {
						url: window.location.href, // pass the current url to the notification
					},
					badge: 'http://ahmbcode.id/img/logo.png',
					icon: 'http://ahmbcode.id/img/logo.png',
					image: 'http://ahmbcode.id/img/logo.png',
					vibrate: [500, 300, 500],
					silent: false,
					actions: [
						{
							action: 'open_google',
							title: 'Open Google',
							//icon:'http://ahmbcode.id/img/logo.png'
						},
						{
							action: 'open_gmail',
							title: 'Open Gmail',
							//icon:'http://ahmbcode.id/img/logo.png'
						}
					]
				}
			);
		}
	});
}

function closeAllNotifications() {
	navigator.serviceWorker.getRegistration().then(function(registration){
		registration.getNotifications().then(function(notifications){
			notifications.forEach(function(notification){
				notification.close();
			});
		});
	});
}
</script>

sw.js

self.addEventListener('install', function(event) {
	console.log('[SERVICE-WORKER] - Service worker installed successful.');
	event.waitUntil(self.skipWaiting());
});

self.addEventListener('activate', function(event) {
	console.log('[SERVICE-WORKER] - Service worker activated');
	event.waitUntil(self.clients.claim());
});

self.addEventListener('notificationclick', function(event) {

	console.log('[SERVICE-WORKER] - Notification Action : ', event.action);
	console.log('[SERVICE-WORKER] - Notification Data   : ', event.notification.data);

	// event.notification.close();

	if(event.action === 'open_google') {
		openPage('https://www.google.com', event);
	}
	else if(event.action === 'open_gmail') {
		openPage('https://mail.google.com', event);
	}
});

// Check the browser for update the current tab or open new tab
function openPage(url, event) {
	event.waitUntil(
		self.clients.matchAll().then(function(clientList) {
			
			if (clientList.length > 0) { // If Tab is currently open

				clientList[0].postMessage('Opening -> ' + url);	// Send data to Window

				clientList[0].navigate(url);		// Redirect URL in current tab
				return clientList[0].focus();		// Focus in current tab
			}

			// If Tab are closed
			return self.clients.openWindow(url);
		})
	);
}


You  need run this app on http://{host} .

For developer tools, you can inspect the service workers at chrome://inspect/#service-workers


Reference :