
There’s an add-on for the Arduino IDE that allows you to program the ESP32 using the Arduino IDE and its programming language. In this tutorial we’ll show you how to install the ESP32 board in Arduino IDE whether you’re using Windows, Mac OS or Linux.
Installation
Step 1
Install Arduino IDE from https://arduino.cc/en/software
Step 2
Install CP210x USB to UART Bridge VCP Drivers from https://silabs.com/developers/usb-to-uart-bridge-vcp-driversStep 3
Install ESP32 Add-on in Arduino IDE- In your Arduino IDE, go to File > Preferences

- Enter https://dl.espressif.com/dl/package_esp32_index.json into the “Additional Board Manager URLs” field as shown in the figure below. Then, click the “OK” button:

https://dl.espressif.com/dl/package_esp32_index.json, http://arduino.esp8266.com/stable/package_esp8266com_index.json
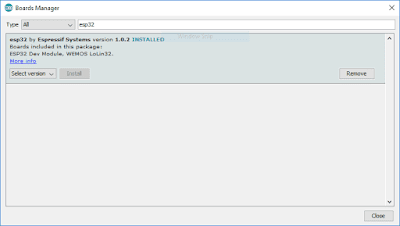
- Open the Boards Manager. Go to Tools > Board > Boards Manager…

- Search for ESP32 and press install button for the “ESP32 by Espressif Systems“:

- That’s it. It should be installed after a few seconds.
- Finish


Testing the Installation
Plug the ESP32 board to your computer. With your Arduino IDE open, follow these steps:
- Select your Board in Tools > Board menu (in my case it’s the DOIT ESP32 DEVKIT V1)

- Select the Port

- Open the following example under File > Examples > WiFi (ESP32) > WiFiScan

- A new sketch opens in your Arduino IDE:

- Press the Upload button in the Arduino IDE. Wait a few seconds while the code compiles and uploads to your board.

- If everything went as expected, you should see a “Done uploading.” message.

- Open the Arduino IDE Serial Monitor at a baud rate of 115200
- Press the ESP32 on-board Enable button and you should see the networks available near your ESP32:


Troubleshooting
If you try to upload a new sketch to your ESP32 and you get this error message “A fatal error occurred: Failed to connect to ESP32: Timed out… Connecting…“. It means that your ESP32 is not in flashing/uploading mode.
Having the right board name and COM port selected, follow these steps:
- Hold-down the “BOOT” button in your ESP32 board

- Press the “Upload” button in the Arduino IDE to upload your sketch:

- After you see the “Connecting….” message in your Arduino IDE, release the finger from the “BOOT” button:

- After that, you should see the “Done uploading” message


That’s it. Your ESP32 should have the new sketch running. Press the “ENABLE” button to restart the ESP32 and run the new uploaded sketch.
You’ll also have to repeat that button sequence every time you want to upload a new sketch.
If you experience any problems or issues with your ESP32, take a look at our in-depth ESP32 Troubleshooting Guide.
If you experience any problems or issues with your ESP32, take a look at our in-depth ESP32 Troubleshooting Guide.
Wrapping Up
This is a quick guide that illustrates how to prepare your Arduino IDE for the ESP32 on a Windows PC, Mac OS X, or Linux computer. If you encounter any issues during the installation procedure, take a look at the ESP32 troubleshooting guide.
Reference :


0 komentar: