Friday, October 1, 2021

How to Configure PostgreSQL to Accept All Incoming Connections


Edit pg_hba.conf

Just use 0.0.0.0/0

host    all             all             0.0.0.0/0            md5

Make sure the listen_addresses in postgresql.conf (or ALTER SYSTEM SET) allows incoming connections on all available IP interfaces.

listen_addresses = '*'

After the changes you have to reload the configuration. One way to do this is execute this SELECT as a superuser.

SELECT pg_reload_conf();

** Note: to change listen_addresses, a reload is not enough, and you have to restart the server.


Reference :


Thursday, August 6, 2020

Nginx Extra Security & Performance Tuning Example


Advanced configuration for Nginx

There are some small changes you can make to make your website faster, and a little more secure.

Security enhancements

The original configuration will keep you safe, but it is always good to see what else can be done.

Giving less information to attackers

By default, the nginx.conf will return "403 Forbidden" errors for system files that are not supposed to be accessed directly. However, there's a good alternative, like so:

server {
    ...

    ## Begin - Index
    # for subfolders, simply adjust:
    # `location /subfolder {`
    # and the rewrite to use `/subfolder/index.php`
    location / {
        try_files $uri $uri/ @index;
    }

    location @index {
        try_files = /index.php?_url=$uri&$query_string;
    }
    ## End - Index

    ## Begin - Security
    # set error handler for these to the @index location
    error_page 418 = @index;
    # deny all direct access for these folders
    location ~* /(\.git|cache|bin|logs|backup|tests)/.*$ { return 418; }
    # deny running scripts inside core system folders
    location ~* /(system|vendor)/.*\.(txt|xml|md|html|yaml|yml|php|pl|py|cgi|twig|sh|bat)$ { return 418; }
    # deny running scripts inside user folder
    location ~* /user/.*\.(txt|md|yaml|yml|php|pl|py|cgi|twig|sh|bat)$ { return 418; }
    # deny access to specific files in the root folder
    location ~ /(LICENSE\.txt|composer\.lock|composer\.json|nginx\.conf|web\.config|htaccess\.txt|\.htaccess) { return 418; }
    ## End - Security
    ...
}

What happens here is the following:

  • Try and see if the file exists on disk, and if not, give the request to the @index location.
  • The new @index location will reroute requests to the /index.php as usual.
  • Instead of returning a "403 Forbidden" error, we now return a 418.
  • Because we set the error_page 418, any 418 will be handled by the @index location.
  • Grav's /index.php will pick up the route it is given, determine if there's a matching route,
    and if not, simply return a 404 by itself.

Normally, we route all non-existing files to Grav. However, returning any status code from nginx itself, will give a different kind of error than if it had been routed through Grav. That gives the attacker the information that those files are special and actually exist. More than that, that you explicitly don't want them to try and read those. They will try harder.

This is better, because if you reroute it to Grav, Grav will handle it like any other non-existing file.

No direct access to other .php-files

In the example nginx.conf, all requests to files ending in .php are sent to the PHP-handler. This is not necessary, as Grav only uses the /index.php to route requests. Every other location is handled internally.

Some vulnerabilities in CMS's are targeted specifically at plug-ins, themes or other third-party libraries. There is no reason to keep direct access to them open (unless you run Grav combined with other pieces of software in the same webroot!).

So, alternatively, only route /index.php to the PHP-handler, and block the rest! Like so:

server {
    ...
    ## Begin - PHP
    location = /index.php {
        # Choose either a socket or TCP/IP address
        fastcgi_pass unix:/var/run/php7.0-fpm.sock;
        # fastcgi_pass 127.0.0.1:9000;

        fastcgi_split_path_info ^(.+\.php)(/.+)$;
        fastcgi_index index.php;
        include fastcgi_params;
        fastcgi_param SCRIPT_FILENAME $document_root$fastcgi_script_name;
    }
    ## End - PHP

    ## Begin - Security
    ...
    # deny access to other .php-scripts
    location ~ \.php$ { return 418; }
    ...
    ## End - Security
    ...
}

With this, any .php-file that is not /index.php, will be rerouted to and be handled by /index.php.

Performance

nginx is a very capable webserver, but it is also very capable of doing advanced caching.

Do not check for the existence of directories

Many, many examples use this line:

try_files $uri $uri/ @index;

Few people actually realise that it does, which is:

  1. Check for the existence of the file.
  2. If it does not exist, try and see if there's a directory with that name.
  3. Otherwise, fall back to @index (/index.php).

But, in reality, you only really use $uri/ (step 2) if you really are linking to a directory that will have its own index.php or index.html. Considering you're using Grav, you will only go to /, and that already goes to /index.php in step 3.

If you're not going to use it, don't keep it around, and you will take out an extra filesystem stat():

try_files $uri @index;

Caching filesystem metadata of files

The open file cache caches metadata about files. If they exist or not, what file permissions they have, if they are readable or not.. This can help a little on local filesystems, especially that are not on SSD. It shines more in environments with network storage (like NFS).

Keep in mind that this goes outside of the server{}-block, directly into the http{}-context:

open_file_cache                 max=10000 inactive=5m;
open_file_cache_valid           1m;
open_file_cache_min_uses        1;
open_file_cache_errors          on;

server {
    ...
}

In this example, we told nginx to:

  • Keep a maximum of 10k entries.
  • Delete metadata of a file from the cache if they it is not used for 5 minutes.
  • Refresh the metadata it has every minute.
  • Put the metadata of a file in the cache immediately upon accessing it the first time.
  • Cache errors like "Permission denied", "Not found", as well.

Precompressing resources

In the example nginx.conf, we enable GZip-compression. While excellent, it also means that the output is compressed on a per-request basis. This in turn means that with every request, it adds extra CPU-cycles and latency (you have to wait or the compression to be done).

There is an alternative in nginx, which is gzip_staticgzip_static will make nginx look for the same file, but with a .gz extension. So if I have main.css, it will try and see if there is already a main.css.gz present, and send that instead.

To enable this, use:

server {
    ...

    ## Begin - Index
    ...

    location / {
        try_files $uri @index;

        location /assets {
            gzip_static on;
        }
    }

    ...
    ## End - Index
    ...
}

By using a nested location /assets, you will not incur extra filesystem stat()s for the rest of Grav.
If enabled, the /assets location will contain pipelined/minified assets.

!! nginx does not automatically compress the files for you. You will have to do this yourself.

To compress the files (on UNIX-based systems), you can do the following:

cd assets
for asset in *.css *.js; do gzip -kN9 "$asset"; done

Note that these are automatically deleted when you clear your (asset) cache, and you will have to redo it after new resource files are created. There is an outstanding Pull Request to allow automatic precompression of assets upon creation of these files.

Enable FastCGI caching.

** DO NOT USE THIS KIND OF CACHING IF YOU HAVE DYNAMIC PAGE CONTENT **

The following example is safe to use with authentication, and the Admin interface. It is also safe for dynamic page content, but your dynamic content will not be dynamic anymore (as it is aggressively statically cached).

nginx has caching for FastCGI. In the example below, we will leverage this. Note that if anything on the site sets a cookie or similar dynamic content headers, the cache is invalid and will not be used at all.

First, we are going to need to make a map{} in the main http{}-context (so outside/before the server{}-block) to convert our optional session cookie into a unique identifier for the cache (so users with different sessions do not share the same cached resource, all of them will have a unique copy, but cached for their own session):

# This is to have caching enabled when site sessions are turned on.
# It makes FastCGI caching safe to use with authenticated content.
map $http_cookie $sessionkey {
    default '';
    ~grav-site-(?<hash>[0-9a-f]+)=(?<sessionid>[^\;]+) $hash$sessionid;
}

server {
    ...
}

If you renamed your site session name (setting session.name) in your Grav config, update its name in the example above! The regular expression will combine the unique identifier in the cookie name with the session id in the cookie into a new variable $sessionkey, which we can later use in the fastcgi_cache_key setting. Next, define a cache zone in the same context right under it:

fastcgi_cache_path      /path/to/cache/on/disk          levels=1:2
                        keys_zone=fastcgi:10m           max_size=200m
                        inactive=60m                    use_temp_path=off;

You should change the path of where the cache is stored on disk, but what it does is:

  1. Set the path. You can use this to cache on disks that might be faster. (Tip: Use /dev/shm/something on Linux systems to use a RAM-disk instead!).
  2. Define the directory hierarchy structure of 1 character, then 2 characters. (i.e. /path/to/cache/on/disk/c/29/...)
  3. Give the cache zone a name ("fastcgi" here) and an initial size (10 MB).
  4. Allow a maximum of 200 MB to be cached.
  5. Delete a resource from the cache if it hasn't been used for 60 minutes.
  6. Do not base the cache path off of fastcgi_temp_path.

Next, you can use this cache zone in your configuration:

server {
    ...
    ## Begin - PHP
    location = /index.php {
        ## Begin - FastCGI caching
        fastcgi_cache           fastcgi;
        fastcgi_cache_key       "$scheme$request_method$host$request_uri$sessionkey";
        fastcgi_cache_valid     200 30m;
        fastcgi_cache_valid     404 5m;
        fastcgi_cache_valid     any 1m;
        fastcgi_ignore_headers  "Cache-Control"
                                "Expires"
                                "Set-Cookie";

        fastcgi_cache_use_stale error
                                timeout
                                updating
                                http_429
                                http_500
                                http_503;

        fastcgi_cache_background_update on;
        ## End - FastCGI caching

        # Choose either a socket or TCP/IP address
        fastcgi_pass unix:/var/run/php7.0-fpm.sock;
        # fastcgi_pass 127.0.0.1:9000;

        fastcgi_split_path_info ^(.+\.php)(/.+)$;
        fastcgi_index index.php;
        include fastcgi_params;
        fastcgi_param SCRIPT_FILENAME $document_root$fastcgi_script_name;
    }
    ## End - PHP
}

Now, what is happening here, is the following:

  • The cache zone named "fastcgi" will be used for this (we defined that earlier).
  • The cache key to lookup a cached resource is set to something like "httpsGETwww.example.com/".
  • Cache times:
    • 200 "OK"-responses: 30 minutes.
    • 404 "Not Found"-responses: 5 minutes.
    • Any other status code: 1 minute.
  • Ignore the Cache-ControlExpires and Set-Cookie headers (since we're in control here).
  • Keep serving our cache when the following happens:
    • There is an error.
    • There is a timeout.
    • nginx is busy updating the cache.
    • There is a 429 Too Many Requests on the backend (backend is too busy).
    • There is a 500 Internal Server Error on the backend (backend has a misconfiguration).
    • There is a 503 Gateway Timeout to the backend (backend has other problems).
  • And last but not least: Upgrade the cache in the background, don't make our clients wait.

Please note, once again, that this will not (and should not) work if you're using the Admin panel, or use any other sessions on your site. It is not recommended to use this caching with any authenticated content, for security reasons.

If you wish to test if your cache is working, you can add a simple header (remove on production):

add_header X-Cache "$upstream_cache_status - $scheme$request_method$host$request_uri$sessionkey";

You can view the header with cURL (or any other tool):

$ curl -I https://www.example.com/
...
X-Cache: MISS - httpsHEADexample.com/en - 7b2fdab20bb2fbi85l61eounburtlxavo
...
$ curl -I https://www.example.com/
...
X-Cache: HIT - httpsHEADexample.com/en - 7b2fdab20bb2fbi85l61eounburtlxavo
...
$

Again, you might want to disable the header after confirming it works.

If you feel the need to purge your cache entirely:

  1. Stop nginx.
  2. Remove the directory.
  3. Start ngnix.

The cache is automatically updated and pruned in the background, so you shouldn't need to do so.

More fine-grained control over (not) caching

If you use the admin interface, you might want to disable caching globally once the admin cookie has been set. Note that an admin cookie is set when you go to the /admin URL, and that anyone can go there by default. You don't need to login to disable caching.

You can use the following example as a basis. Put the map{}s outside your server{} and the fastcgi_*-directives with the rest of the caching directives:

# This is used by fastcgi_cache_bypass and fastcgi_no_cache.
# If you don't want certain URI's cached, add them here with a value of 1.
map $request_uri $no_cache1 {
        default                 0;
        ~^/(../|)admin          1;
}

# This is used by fastcgi_cache_bypass and fastcgi_no_cache.
# To disable caching based on cookie names, add them here with a value of 1.
map $http_cookie $no_cache2 {
    default 0;
    ~grav-site-([0-9a-f]+)-admin=([^\;]+) 1;
}

server {
    ...
    location = /index.php {
        ...
        fastcgi_cache_bypass $no_cache1 $no_cache2;
        fastcgi_no_cache     $no_cache1 $no_cache2;
        ...
    }
}


Nginx Block User Agent Configuration


Try adding something like the following directives to your config to block user agent:

# Disallow User Agent
if ($http_user_agent ~* "agent1|Cheesebot|Catall Spider|LWP::Simple|BBBike|wget|libwww-perl|python|nikto|curl|scan|java|winhttp|HTTrack|clshttp|archiver|loader|email|harvest|extract|grab|miner" ) {
	return 404;
}


HTTP Flood & DDoS Filter via Nginx


Try adding something like the following directives to your nginx config to prevent HTTP Flooding & Distributed Denial of Service (DDoS) :

http {
	limit_conn_zone $binary_remote_addr zone=conn_limit_per_ip:10m;
	limit_req_zone $binary_remote_addr zone=req_limit_per_ip:10m rate=5r/s;

	server {
		limit_conn conn_limit_per_ip 10;
		limit_req zone=req_limit_per_ip burst=10 nodelay;
	}
}


NOTE: http://www.botsvsbrowsers.com/details/504401/index.html says the above user agent is not a known bot


Friday, July 3, 2020

Spring Boot Multiple DataSource Configuration Example


Introduction

Often, you will need to connect to more than one data source. Sometimes, this is for security reasons.
An example of this is the storage of credit card information. You may wish to store the data elements in multiple data sources. If one of the data sources is compromised the data retrieved is useless without the data from other data sources.
In this article, we will configure multiple data sources in Spring Boot and JPA.

Project Setup

Databases

We will use MySQL for our database server.
The credit card scenario described above, will use the following three databases:
  1. Member database(memberdb): Stores personal details of cardholders which include their full name and member id.
  2. Cardholder database(cardholderdb): Stores cardholder details which include the member id and credit card number.
  3. Card database(carddb): Stores the credit card information which includes the owner’s full name and the credit card expiration date.
Since we are spreading the credit card data across three databases, all three would need to be compromised for a security risk.
NOTE: This scenario is for an example of using multiple data sources with Spring Boot. This article is not a security recommendation.

Dependencies

To support MySQL, our classpath must include the MySQL database connector dependency.
Here is the list of Maven dependencies.
  1. <dependencies>
  2. <dependency>
  3. <groupId>org.springframework.boot</groupId>
  4. <artifactId>spring-boot-starter-data-jpa</artifactId>
  5. </dependency>
  6. <dependency>
  7. <groupId>mysql</groupId>
  8. <artifactId>mysql-connector-java</artifactId>
  9. <scope>runtime</scope>
  10. </dependency>
  11. <dependency>
  12. <groupId>org.projectlombok</groupId>
  13. <artifactId>lombok</artifactId>
  14. <optional>true</optional>
  15. </dependency>
  16. <dependency>
  17. <groupId>org.springframework.boot</groupId>
  18. <artifactId>spring-boot-starter-test</artifactId>
  19. <scope>test</scope>
  20. </dependency>
  21. <dependency>
  22. <groupId>commons-dbcp</groupId>
  23. <artifactId>commons-dbcp</artifactId>
  24. <version>${commons.dbcp.version}</version>
  25. </dependency>
  26. </dependencies>

Packaging

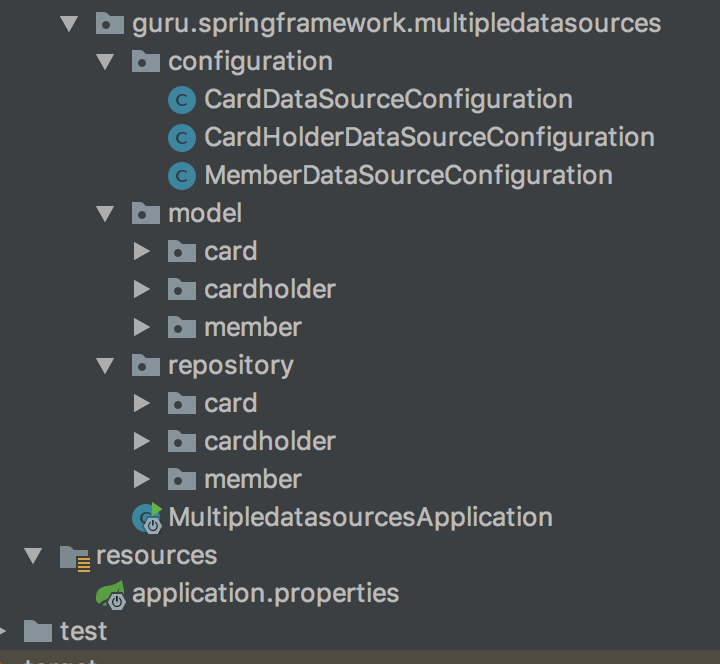
The project packaging structure is very important when dealing with multiple data sources.
The data models or entities belonging to a certain datastore must be placed in their unique packages.
This packaging strategy also applies to the JPA repositories.
Credit Card sample application packaging structure.
As you can see above, we have defined a unique package for each of the models and repositories.
We have also created Java configuration files for each of our data sources:
  • guru.springframework.multipledatasources.configuration.CardDataSourceConfiguration
  • guru.springframework.multipledatasources.configuration.CardHolderDataSourceConfiguration
  • guru.springframework.multipledatasources.configuration.MemberDataSourceConfiguration
Each data source configuration file will contain its data source bean definition including the entity manager and transaction manager bean definitions.

Database Connection Settings

Since we are configuring three data sources we need three sets of configurations in the application.propertiesfile.
Here is the code of the application.properties file.
  1. #Store card holder personal details
  2. app.datasource.member.url=jdbc:mysql://localhost:3306/memberdb?createDatabaseIfNotExist=true
  3. app.datasource.member.username=root
  4. app.datasource.member.password=P@ssw0rd#
  5. app.datasource.member.driverClassName=com.mysql.cj.jdbc.Driver
  6. #card number (cardholder id, cardnumber)
  7. app.datasource.cardholder.url=jdbc:mysql://localhost:3306/cardholderdb?createDatabaseIfNotExist=true
  8. app.datasource.cardholder.username=root
  9. app.datasource.cardholder.password=P@ssw0rd#
  10. app.datasource.cardholder.driverClassName=com.mysql.cj.jdbc.Driver
  11. #expiration date (card id, expiration month, expiration year)
  12. app.datasource.card.url=jdbc:mysql://localhost:3306/carddb?createDatabaseIfNotExist=true
  13. app.datasource.card.username=root
  14. app.datasource.card.password=P@ssw0rd#
  15. app.datasource.card.driverClassName=com.mysql.cj.jdbc.Driver
  16. spring.jpa.hibernate.ddl-auto=update
  17. spring.jpa.generate-ddl=true
  18. spring.jpa.show-sql=true
  19. spring.jpa.database=mysql

Data Source Configuration

It is important to note that during the configuration of multiple data sources, one data source instance must be marked as the primary data source.
Else the application will fail to start-up because Spring will detect more than one data source of the same type.

Steps

In this example, we will mark the member data source as our primary data source.
Here are the data source configuration steps.
  1. Data source bean definition
  2. Entities
  3. Entity Manager Factory bean definition
  4. Transaction Management
  5. Spring Data JPA Repository custom settings

Data Source Bean Definition

To create a data source bean we need to instantiate the org.springframework.boot.autoconfigure.jdbc.DataSourceProperties  class using the data source key specified in the application.properties file. We are going to use this DataSourceProperties object to get a data source builder object.
The data source builder object uses the database properties found in the application.properties file to create a data source object.
The following code shows the bean definitions of our data sources.

Primary Data Source

  1. @Bean
  2. @Primary
  3. @ConfigurationProperties("app.datasource.member")
  4. public DataSourceProperties memberDataSourceProperties() {
  5. return new DataSourceProperties();
  6. }
  7. @Bean
  8. @Primary
  9. @ConfigurationProperties("app.datasource.member.configuration")
  10. public DataSource memberDataSource() {
  11. return memberDataSourceProperties().initializeDataSourceBuilder()
  12. .type(HikariDataSource.class).build();
  13. }

Secondary Data Sources

  1. /*cardholder data source */
  2. @Bean
  3. @ConfigurationProperties("app.datasource.cardholder")
  4. public DataSourceProperties cardHolderDataSourceProperties() {
  5. return new DataSourceProperties();
  6. }
  7. @Bean
  8. @ConfigurationProperties("app.datasource.cardholder.configuration")
  9. public DataSource cardholderDataSource() {
  10. return cardHolderDataSourceProperties().initializeDataSourceBuilder()
  11. .type(BasicDataSource.class).build();
  12. }
  13. /*card data source*/
  14. @Bean
  15. @ConfigurationProperties("app.datasource.card")
  16. public DataSourceProperties cardDataSourceProperties() {
  17. return new DataSourceProperties();
  18. }
  19. @Bean
  20. @ConfigurationProperties("app.datasource.card.configuration")
  21. public DataSource cardDataSource() {
  22. return cardDataSourceProperties().initializeDataSourceBuilder()
  23. .type(BasicDataSource.class).build();
  24. }

Entities

Since we are going to store MemberCard, and Cardholder objects we must declare them as JPA entities using @Entity annotation. These entities will be mapped to relational database tables by JPA.
We must tell Spring which tables belong to a certain data source. There are two ways of achieving this. You can use the ‘schema‘ field of the @Table annotation as indicated in the code snippet below at line 2.
  1. @Entity
  2. @Table(name = "member", schema = "memberdb")
  3. @Data
  4. public class Member {
  5. @Id
  6. @GeneratedValue(strategy = GenerationType.AUTO)
  7. private Long id;
  8. private String name;
  9. private String memberId;
  10. }
Or you may link the entities to their data source is via the org.springframework.boot.orm.jpa.EntityManagerFactoryBuilder class method packages(). We can pass the packages or classes to be scanned for @Entity annotations in this method.
Spring will use this setting to map these entities to tables which will be created in the data source set through the datasource() method of this EMF builder class.
See code snippet in the next section.

Entity Manager Factory Bean Definition

Our application will be using Spring Data JPA for data access through its repository interfaces that abstract us from the EM(Entity Manager). We use the EMF bean to obtain instances of EMs which interact with the JPA entities.
Since, we have three data sources we need to create an EM for each data source.
This is done by providing the EMF builder class with reference to the data source and location of entities.
In our example, we will define this EMF using the org.springframework.orm.jpa.LocalContainerEntityManagerFactoryBean class like this.
  1. /*Primary Entity manager*/
  2. @Primary
  3. @Bean(name = "memberEntityManagerFactory")
  4. public LocalContainerEntityManagerFactoryBean memberEntityManagerFactory(EntityManagerFactoryBuilder builder) {
  5. return builder
  6. .dataSource(memberDataSource())
  7. .packages(Member.class)
  8. .build();
  9. }
  10. /*Secondary Entity Managers*/
  11. @Bean(name = "cardHolderEntityManagerFactory")
  12. public LocalContainerEntityManagerFactoryBean cardHolderEntityManagerFactory(
  13. EntityManagerFactoryBuilder builder) {
  14. return builder
  15. .dataSource(cardholderDataSource())
  16. .packages(CardHolder.class)
  17. .build();
  18. }
  19. @Bean(name = "cardEntityManagerFactory")
  20. public LocalContainerEntityManagerFactoryBean cardEntityManagerFactory(
  21. EntityManagerFactoryBuilder builder) {
  22. return builder
  23. .dataSource(cardDataSource())
  24. .packages(Card.class)
  25. .build();
  26. }

Transaction Management

The bean definition of a transaction manager requires a reference to the entity manager factory bean. We will to use the @Qualifier annotation to auto-wire the entity manager specific to the data source’ s transaction manager.
A transaction manager is needed for each data source.
The following is a snippet of code showing the member data source transaction manager bean definition.
  1. @Primary
  2. @Bean
  3. public PlatformTransactionManager memberTransactionManager(
  4. final @Qualifier("memberEntityManagerFactory") LocalContainerEntityManagerFactoryBean memberEntityManagerFactory) {
  5. return new JpaTransactionManager(memberEntityManagerFactory.getObject());
  6. }

JPA Repository Configuration

Since we are going to have multiple data sources we must provide the specific information for each data source repository using Spring’ s @EnableJpaRepositoriesannotation. In this annotation, we are going to set the reference to an entity manager, the repositories location and the reference to the transaction manager.
Below is the ‘member’ data source’s JPA repository settings.
  1. @Configuration
  2. @EnableTransactionManagement
  3. @EnableJpaRepositories(basePackages = "guru.springframework.multipledatasources.repository.member",
  4. entityManagerFactoryRef = "memberEntityManagerFactory",
  5. transactionManagerRef= "memberTransactionManager"
  6. )
  7. public class MemberDataSourceConfiguration { .... }
Line number 3
basePackages: We use this field to set the base package of our repositories. For instance, for the member data source, it must point to the package guru.springframework.multipledatasources.repository.member
Line number 4:
entityManagerFactoryRef: We use this field to reference the entity manager factory bean defined in the data source configuration file. It is important to take note of the fact that the entityManagerFactoryRef value must match the bean name (if specified via the name field of the @Bean annotation else will default to method name) of the entity manager factory defined in the configuration file.
Line number 5:
transactionManagerRef: This field references the transaction manager defined in the data source configuration file. Again it is important to ensure that the transactionManagerRef  value matches with the bean name of the transaction manager factory.

Complete Data Source Configuration File

Below is the complete data source configuration for our primary data source(member database). The complete card and cardholder configuration files are available on GitHub. They are similar to this one except that they are secondary data sources.
  1. @Configuration
  2. @EnableTransactionManagement
  3. @EnableJpaRepositories(basePackages = "guru.springframework.multipledatasources.repository.member",
  4. entityManagerFactoryRef = "memberEntityManagerFactory",
  5. transactionManagerRef= "memberTransactionManager"
  6. )
  7. public class MemberDataSourceConfiguration {
  8. @Bean
  9. @Primary
  10. @ConfigurationProperties("app.datasource.member")
  11. public DataSourceProperties memberDataSourceProperties() {
  12. return new DataSourceProperties();
  13. }
  14. @Bean
  15. @Primary
  16. @ConfigurationProperties("app.datasource.member.configuration")
  17. public DataSource memberDataSource() {
  18. return memberDataSourceProperties().initializeDataSourceBuilder()
  19. .type(HikariDataSource.class).build();
  20. }
  21. @Primary
  22. @Bean(name = "memberEntityManagerFactory")
  23. public LocalContainerEntityManagerFactoryBean memberEntityManagerFactory(EntityManagerFactoryBuilder builder) {
  24. return builder
  25. .dataSource(memberDataSource())
  26. .packages(Member.class)
  27. .build();
  28. }
  29. @Primary
  30. @Bean
  31. public PlatformTransactionManager memberTransactionManager(
  32. final @Qualifier("memberEntityManagerFactory") LocalContainerEntityManagerFactoryBean memberEntityManagerFactory) {
  33. return new JpaTransactionManager(memberEntityManagerFactory.getObject());
  34. }
  35. }
Important Points to note:
entity manager factory bean: Please make sure that you are referencing the correct data source when creating the entity manager factory bean otherwise you will get unexpected results.
transaction manager bean: To ensure that you have provided the correct entity manager factory reference for the transaction manager, you may use the @Qualifier annotation.
For example, the transaction manager of the ‘member’ data source will be using the entity manager factory bean with the name “memberEntityManagerFactory”.

Testing our application

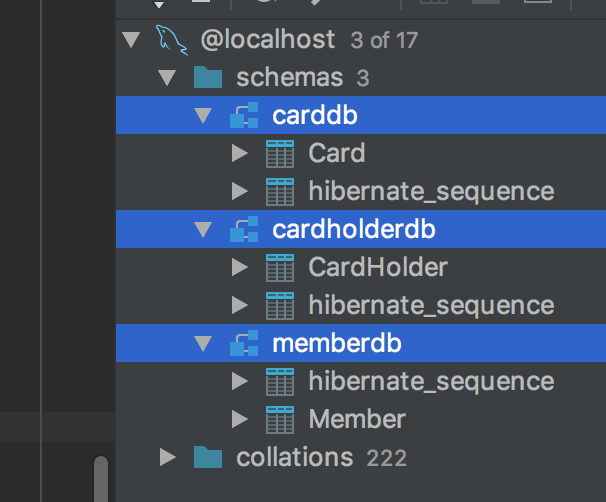
After running the application, the schemas will be updated.
In this example, only one table for each datasource is created.
Credit card Sample Application Databases

Spring Boot Test Class

The test class in the code snippet below contains test methods for each data source.
In each method, we are creating an object and persisting it to the database using the Spring Data JPA repository.
To verify, we check if that data is present in the database.
  1. @RunWith(SpringRunner.class)
  2. @SpringBootTest
  3. public class MultipledatasourcesApplicationTests {
  4. /*
  5. * We will be using mysql databases we configured in our properties file for our tests
  6. * Make sure your datasource connections are correct otherwise the test will fail
  7. * */
  8. @Autowired
  9. private MemberRepository memberRepository;
  10. @Autowired
  11. private CardHolderRepository cardHolderRepository;
  12. @Autowired
  13. private CardRepository cardRepository;
  14. private Member member;
  15. private Card card;
  16. private CardHolder cardHolder;
  17. @Before
  18. public void initializeDataObjects(){
  19. member = new Member();
  20. member.setMemberId("M001");
  21. member.setName("Maureen Mpofu");
  22. cardHolder = new CardHolder();
  23. cardHolder.setCardNumber("4111111111111111");
  24. cardHolder.setMemberId(member.getMemberId());
  25. card = new Card();
  26. card.setExpirationMonth(01);
  27. card.setExpirationYear(2020);
  28. card.setName(member.getName());
  29. }
  30. @Test
  31. public void shouldSaveMemberToMemberDB() {
  32. Member savedMember =memberRepository.save(member);
  33. Optional<Member> memberFromDb= memberRepository.findById(savedMember.getId());
  34. assertTrue(memberFromDb.isPresent());
  35. }
  36. @Test
  37. public void shouldSaveCardHolderToCardHolderDB() {
  38. CardHolder savedCardHolder =cardHolderRepository.save(cardHolder);
  39. Optional<CardHolder> cardHolderFromDb= cardHolderRepository.findById(savedCardHolder.getId());
  40. assertTrue(cardHolderFromDb.isPresent());
  41. }
  42. @Test
  43. public void shouldSaveCardToCardDB() {
  44. Card savedCard = cardRepository.save(card);
  45. Optional<Card> cardFromDb= cardRepository.findById(savedCard.getId());
  46. assertTrue(cardFromDb.isPresent());
  47. }
  48. }
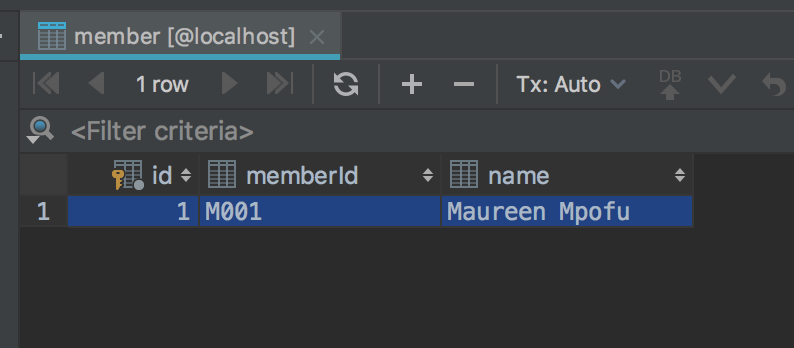
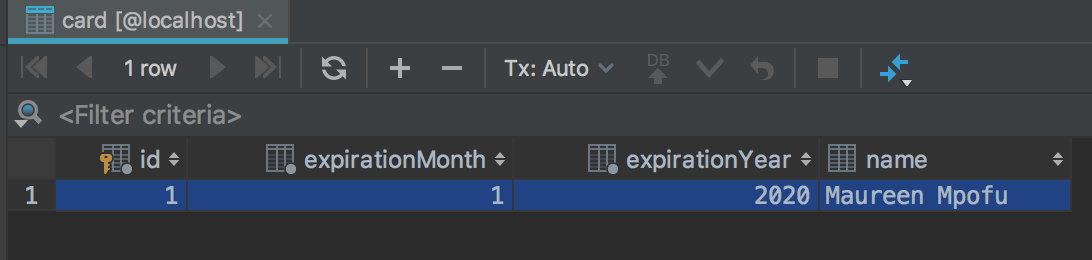
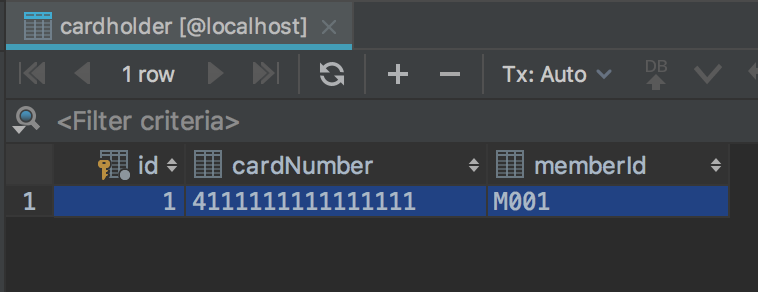
Our test cases passed and the database tables recorded the data persisted via the application(indicated by the screenshots below).

Member Database

Member Database

Card Database

Card database

CardHolder Database

Cardholder database

Conclusion

When dealing with just one datasource and Spring Boot, data source configuration is simple. Spring Boot can provide a lot of auto configuration.
However, if you need to connect to multiple datasources with Spring Boot, additional configuration is needed.
You need to provide configuration data to Spring Boot, customized for each data source.
The source code of our sample application is available on GitHub.  Please update the datasource to your own needs.


Reference: